|
Please Visit One of the Companies Helping to Bring You the Resource Center!
 |
|
How to make
your own "Steelhead Rags"
Finally
... it's the one a lot of you have been waiting for!
We've received dozens
and dozens of emails looking for rag-making instructions ... so by popular
request, here you go!
Got a good connection and want a video???
Just click
here!!
|
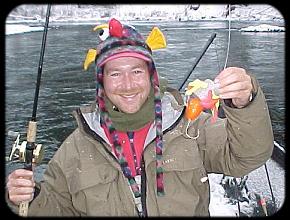
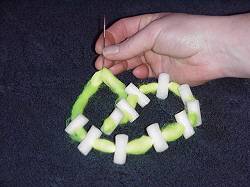
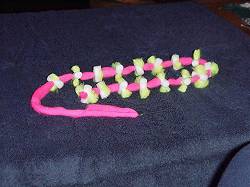
The rag ... in this case, one a little bigger than
we'd normally ever fish. But big baits catch big fish, don't they? |
|
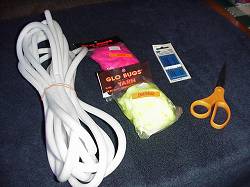
Your
first step is to gather your necessary materials: Backer rod (window
insulation foam ... available in large quantities from some hardware stores
and smaller sections from many tackle dealers); one to three (maybe four)
colors of yarn. We usually use two colors. Glo-Bug yarn as it is very
thick and makes a finished rag with a large profile. Some good sharp
scissors, and some yarn darning needles (a few smaller ones for your final
step might be a good bet too, but the bigger ones will work fine). |
 |
|
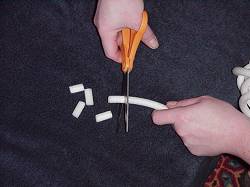
Second
step is to cut your backer rod. We usually use 3/8 and 5/8 inch diameter
foam for our rags, but you can also get bigger and smaller sizes too if you
wish to make itsy-bitsy or monster rags if you prefer.
Simply cut your backer rod with the scissors.
We usually use lengths about 1 to 1 1/2 inches for our rags.
|
 |
|
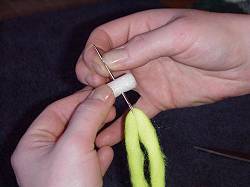
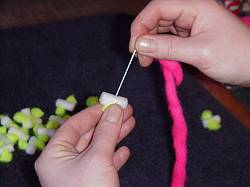
Next
step is to thread your needle with the first color of yarn ... be patient
with this step, it will take a little practice to figure out out to get a
big tuft of yarn into a seemingly small hole. Then push the needle and
yarn through the mid-point of the foam and slide the foam down the yarn.
Make sure to pull the foam down slowly, especially with the softer glo-bug
yarn as it is easy to either pull the thread out of the needle or tear the
yarn if you attempt to do this too fast. Pull this first piece of foam
down to 3/4 inch from the end of the yarn. |
 |
|
Next
step is to continue this process of sliding foam pieces down the yarn ...
just like most of us used to do with popcorn on a string. Fit as many foam
pieces as you can on the piece of yarn, leaving about 1 to 11/2 inches of
yarn length between each piece of foam. |
 |
|
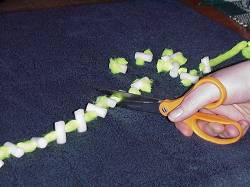
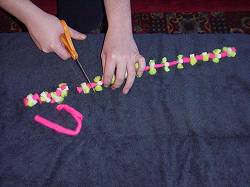
Then
take your scissors and cut the yarn at the mid-point between each piece of
foam.
This will leave you with a pile of rags with one color.
Usually, we use two, sometimes three. Continue to the next step if you wish
to use more than one color. Go here if you you want single color rags and
are ready to rig.
|
 |
|
For
more than one color, just rethread your darning needle with the next
color. Begin threading the foam pieces again. Notice how we like to do this
insertion perpendicular to the first color of yarn. You can offset a
little lesser angle if you're going to do more than two colors. Something
else to keep in mind, if using more than two colors, you may wish to do
the entry points at a different distance from the top and bottom of the
foam as it may get difficult to pull too many colors through if you try
them all at the same point in the rag body. |
 |
|
A
very important hint when working with your second (or third, etc) color(s):
notice how the pieces of the first color (chartreuse in this case) of yarn
are held away from the entry point for the second color (red). If you
allow the red yarn to contact the chartreuse as you pull the red yarn through,
the red yarn will grab the chartreuse yarn and try to pull it into the new
entry hole, creating a real mess .. so be careful here! |
 |
|
Continue
threading the foam pieces just as you did previously. Again be VERY
CAREFUL to do this slowly and avoid contact with other pieces of yarn. In
most cases, we do smaller groups of ten or 12 rags at once rather than
trying to string 50. |
 |
|
Next
step is to cut at the midpoint of the second color of yarn (red in this
case).
Keep snipping away, and all of a sudden, you have a big
pile of finished rags!
But of course, you're not done yet! Now on to how to rig
them!
|
 |
|
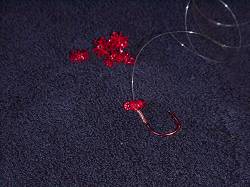
We use leaders of about 24 inches for most of
our rags, usually with a 2/0 hook. They float very, very high, so don't go
with too long of a leader or the finished product will often ride too high
in the water column and out of the "strike zone". On all of our rags, we
use some sort of a hard plastic bead between the hook and the rag. This
prevents the rag body from being pushed down over the eye of the hook.
Some people use sequins, some use round beads ... they work just fine, but
we usually use a star bead available at local craft shops as they are about
the same diameter as the rag body and evenly distribute pressure across
the entire diameter of the foam.
|
 |
|
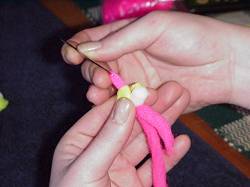
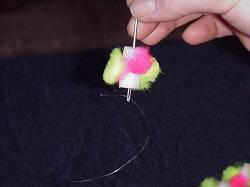
Next
step is to thread your leader on the needle as pictured and pull the
leader up through the rag body lengthwise. This can be awfully tough to do
with cold hands on the river, so we highly suggest doing this ahead of time
at home and putting the finished leaders in a Pip's Dispenser or on a
roller. We have threaded the leader with the larger yarn darning needle in
this picture, but a smaller diameter needle makes this step a little
easier. |
 |
|
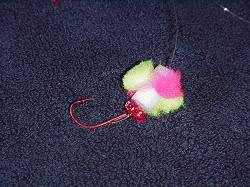
Here's your final product! A two-color rag.
Usually, we use contrasting colors
ourselves, but you can opt to use whatever colors suit your fancy.
These fish very well on their own, but are
also very effective with a dab of bait (shrimptails or prawn are our favorites).
|
 |
|
Fish as you would any piece of terminal drift rigs ...
we especially like these when the water visibility is limited (1 to 3 feet
of visibility). Go on out and catch yourself a fish!
|
|