|
Please Visit One of the Companies Helping to Bring You the Resource Center!
 |
|
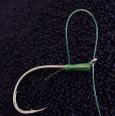
Some
time ago, we posted a tip suggesting that you try placing more turns of line
when tying the egg loop. We received a number of emails from anglers stating
that this tip helped keep the bait on better than the 'standard' number of
wraps ... however, we also received a number of emails from those that didn't
know how to tie this knot in the first place. So, for those of you needing
some help with that ... here you are!
 You can choose to learn how to tie this knot from the
following description and pictures, or if you wish, click here to visit our
videos
page to download a video of Bob tying the knot. You can choose to learn how to tie this knot from the
following description and pictures, or if you wish, click here to visit our
videos
page to download a video of Bob tying the knot.
|
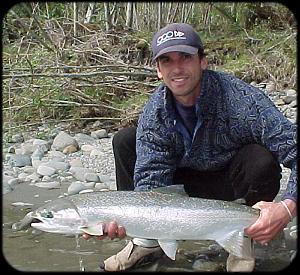
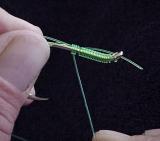
A solid egg loop provided the connection to this
bright Olympic Peninsula hen. |
|
Some advice for first tying this knot - (1) always remember
to work slowly until you really have the hang of it and (2) always keep your
loops tight ... let them get loose while you're tying and it's all over! We will describe how to tie this know for right handers ... lefties, well,
you'll just have to reverse everything. |
|
First off, cut off your piece of leader - this knot usually
consumes about 8 inches of line when tying, so cut accordingly - if you want
a leader of about three feet, start with a piece of line just under four
feet in length. |
 |
|
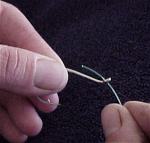
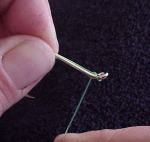
Start
the knot tying process by holding the bend of the hook inbetween you left
thumb and forefinger at the bend of the hook and feeding one end of the line
through the eye of the hook until you can grasp it with the same fingers
holding the hook ... hold on to the hook and line tightly. |
 |
|
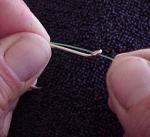
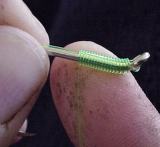
Next, begin wrapping the line around the shank of the hook
just behind the eye in a clockwise direction. The first loop is the toughest
to make and you'll find that you have to exert pressure in just the right
direction to start it. |
 |
|
Continue
wrapping backward towards the shank of the hook ... we like about 18-20 wraps
to hold the bait better as mentioned previously. Be sure to make these
wraps tight and always keep pressure on the line so that the loops don't
come loose. |
 |
|
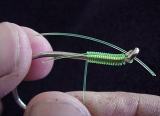
Your
next step is to place the opposite end of the leader parallel to the shank
of the hook and go through the eye in the opposite direction that you
originally did. The tricky part here is holding the line tight on the first
set of wraps you made. Don't put the leader through the eye more than an
inch or so or it makes the next step tough! |
 |
|
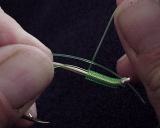
Your
next step is to now wrap over the line that you put through the eye. Also
make these wraps clockwise. On this set of wraps, we like to only wrap with
medium pressure as it makes following steps easier and keeps lightweight
lines from burning and weakening in the process. |
 |
|
Continue to make about four or five wraps. Throughout this
process, always make sure that wraps do not overlap or else the know will
not pull tight correctly. |
 |
|
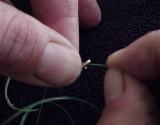
Now, while maintaining pressure with your right hand on the
line with which you made your wraps, grasp all of the wraps on the shank
of the hook with your left thumb and forefinger to hold them tightly. With
your right hand (or your teeth as we like to do), grasp the little bit of
line left hanging out of the eye and pull it through the wraps in your left
hand. Make sure to do this slowly, as there will be some twist in the line
that you are pulling through and it must uncoil itself as you slide it
through ... otherwise, you're going to have a big mess! |
 |
|
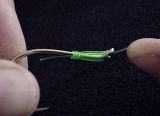
Final
step is easy, just pull everything snug!!! You'll probably mess this up the
first time, but hang with it. Everybody who ties this knot on a regular
basis has a favorite way to keep pressure on the line while tying the knot.
Just do what is most comfortable for you! |
 |
|
Remember, you can see a video of this procedure located in
the videos section if you want to see it done that
way! Good luck! |
|